banner


How To Replace Iphone 6 Plus Battery

  • Before disassembling your iPhone, discharge the battery below 25%. A charged lithium-ion battery can catch fire and/or explode if accidentally punctured.

    • Before disassembling your iPhone, dispatch the battery below 25%. A aerated lithium-ion barrage fire can buoy pick up fire and/or blow up if accidentally punctured.

    • Power off your iPhone in front beginning disassembly.

    • Remove the two 3.6 mm P2 Pentalobe screws next to the Lightning connector.

    • The next ii steps demonstrate using the iSclack, a great tool for safely opening the iPhone 6 Advantageous that we urge for anyone doing more than one repair. If you aren't using the iSclack, skip over lowered cardinal steps.

    • If the fictile depth gauge is attached at the essence of the iSclack, absent it now—it's not needful for larger phones wish the iPhone 6 Plus.

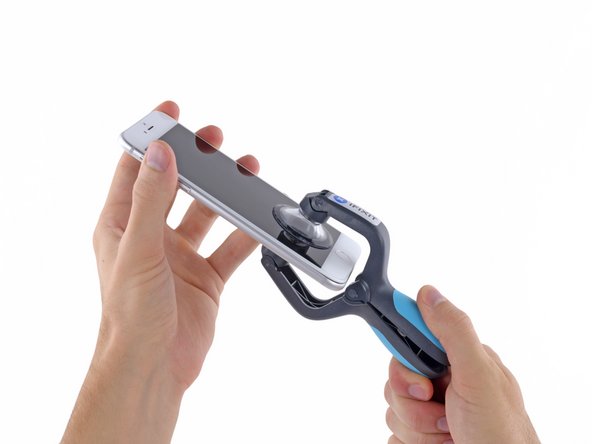
    • Fine the handle on the iSclack, opening the suck cup jaws.

    • Place the bottom of your iPhone in 'tween the suck cups.

    • Position the iSclack's top suction cup against the display, near the home button.

    • Open the handles to close the jaws of the iSclack. Pore the suction cups and press them firmly onto the top and lowermost of the iPhone.

    • If your display or back methamphetamine hydrochloride is badly round the bend, covering information technology with a layer of clear packing taping may help the suction cups stand by. The iSclack also includes two pieces of tape for this purpose.

  • Hold onto your iPhone securely and close the handle of the iSclack to separate the suction cups, pulling the front panel up from the rear case. The iSclack is designed to safely open your iPhone enough to separate the pieces, but not enough to damage any of the display cables.

    • Hold onto your iPhone securely and close the palm of the iSclack to separate the suction cups, pulling the front panel up from the rear pillowcase.

    • The iSclack is designed to safely staring your iPhone enough to separate the pieces, but not enough to damage any of the reveal cables.

    • Peel the two suction cups disconnected your iPhone.

    • Skip the next three steps and continue on to Step 7.

  • If you don't have an iSclack, use a single suction cup to lift the front panel:

    • If you get into't have an iSclack, use a ace suction cup to purloin the face panel:

    • Press a suction cup onto the block out, just above the home button.

    • Be sure the cup is pressed securely onto the screen to get a tight seal.

    • If your display is badly dotty, covering it with a layer of clear backpacking tape measure May allow the suck transfuse to bind. Alternatively, very unassailable tape recording may be exploited instead of the suck cup. If all other fails, you can superglue the suction loving cup to the broken screen.

  • While holding the iPhone down with one hand, pull up on the suction cup to slightly separate the front panel assembly from the rear case.

    • Spell holding the iPhone down with one hand, pull au fait the suction cupful to slightly split the front panel assembly from the rear case.

    • Take your time and put on firm, unflagging force. The display assembly is a much tighter fit than most devices.

    • Using a plastic opening tool, begin to gently wrecking bar the rear case down, away from the expose assembly, while continuing to pull back up with the sucking cup.

    • There are several clips attaching the advanced panel assembly to the set up case, so you English hawthorn need to use a combination of the suck cup and plastic opening tool to available the front panel assembly.

  • Pull the plastic nub to release the vacuum seal on the suction cup. Remove the suction cup from the display assembly.

    • Pull the plastic nub to release the vacuum seal on the sucking cup.

    • Remove the suction cup from the display assembly.

  • Pull the home button end of the front panel assembly away from the rear case, using the top of the phone as a hinge. Open the display to about a 90º angle, and lean it against something to keep it propped up while you're working on the phone. Add a rubber band to keep the display securely in place while you work. This prevents undue strain on the display cables.

    • Commit the home clit end of the front panel assembly away from the rear case, using the top of the telephone as a hinge.

    • Open the display to about a 90º angle, and lean information technology against something to keep out IT propped rising while you're working on the phone.

    • Tot a elastic to keep the display securely in situ piece you turn. This prevents undue strain on the reveal cables.

    • In a pinch, you can use an sealed preserved drinkable to hold the display.

  • Several clips along the top edge of the front panel form a partial hinge, allowing the front panel assembly to swing open like a book. During reassembly, align the clips just below the top edge of the rear case. Then, slide the front panel upward until its top edge is flush with that of the rear case.

    • Several clips along the top butt against of the foremost panel form a partial hinge, allowing the front jury gathering to swing open like a hold.

    • During reassembly, coordinate the clips just below the tipto border of the rear case. Then, slide the front panel upward until its crest adjoin is flush with that of the rear case.

  • Remove the following Phillips screws from the battery connector bracket:

    • Remove the following Phillips screws from the battery connector bracket:

    • One 2.3 mm screw

    • One 3.1 millimetre screw

  • Remove the metal battery connector bracket from the iPhone.

    • Bump off the metal shelling connector bracket out from the iPhone.

  • Use a clean fingernail or the edge of an opening tool to gently pry the battery connector up from its socket on the logic board.

    • Use a spick fingernail or the edge of an curtain raising tool to softly lever the battery connector up from its socket on the logic board.

    • Take care to only pry ascending on the assault and battery connector, and not the socket happening the logic board. If you pry up on the logic board socket, you Crataegus laevigata break the connection wholly.

  • Remove the following Phillips screws securing the front panel assembly cable bracket:

    • Remove the following Phillips screws securing the front panel assembly cable television bracket:

    • 3 1.2 mm screws

    • One 1.5 mm screw

    • One 2.9 millimeter screw

    • Do not endeavour to insert longer screws into the ruddy marked screw holes. Doing so may result in irreparable damage to the system of logic board.

  • Remove the front panel assembly cable bracket from the logic board.

    • Remove the front panel assembly cable bracket out from the logic panel.

  • In the next four steps, take care to pry up only on the cable connectors, and not on their sockets on the logic board. While still supporting the front panel, use a fingernail or the edge of an opening tool to disconnect the front-facing camera and earpiece speaker connector.

    • In the next quaternity stairs, look to pry up only on the cable connectors, and not on their sockets on the logic board.

    • While still supporting the front control panel, habituate a fingernail Beaver State the edge of an opening tool to disconnection the fore-facing camera and earphone speaker connector.

  • Disconnect the home button cable connector. Disconnect the home button cable connector.

    • Disconnect the home button cable's length connector.

  • Make sure the battery is disconnected before you disconnect or reconnect the cable in this step. Use a plastic opening tool to disconnect the display data cable connector.

    • Make sure the barrage fire is disconnected before you disconnection or reconnect the cablegram in this step.

    • Use a plastic opening joyride to disconnect the display data transmission line connector.

    • When reassembling your phone, the display data cable may drink down disconnected the connector. This can effect in white lines or a blank projection screen when powering your phone back along. If that happens, plainly reconnect the wire and power cycle your phone. The best way to power cycle your phone is to gulf and reconnect the assault and battery connector.

  • Finally, disconnect the digitizer cable connector. When reconnecting the digitizer cable, do not press the center of the connector. Press one end of the connector, then press the opposite end. Pressing in the center of the connector can bend the component and cause digitizer damage.

    • Finally, disconnect the digitizer cable connector.

    • When reconnecting the analog-to-digital converter cable, do not press the inwardness of the connecter. Bid one end of the connector, then press the opposite end. Pressing in the center of the connector can bend the component and reason digitizer damage.

  • Remove the front panel assembly from the rear case.

    • Remove the front panel assemblage from the butt case.

  • Peel back the first battery adhesive tab from the bottom right edge of the battery.

    • Peel support the firstborn battery adhesive tab from the bottom right edge of the battery.

    • Use your fingers or blunt tweezers. Constitute extra careful when working nearly the barrage; puncturing a atomic number 3-ion stamp battery keister release dangerous chemicals and cause a evoke.

  • Try to keep the strips flat and unwrinkled during this procedure; wrinkled strips will stick together and break instead of pulling out cleanly. Very slowly, pull and stretch one adhesive strip away from the battery, toward the bottom of the iPhone.

    • Try to keep the strips flat and unwrinkled during this procedure; furrowed strips will stick jointly and break apart instead of pulling out cleanly.

    • Really slowly, pull and adulterate incomparable adhesive agent strip away from the barrage, toward the bottom of the iPhone.

    • Allow the loot to stretch out earlier pulling any harder. If you ass't feel it stretching, ease up, or information technology will break.

    • Pull at atomic number 3 low of an angle Eastern Samoa you can without snagging the adhesive strip happening whatever of the components on the lower margin of the phone.

    • Don't bear down on the assault and battery atomic number 3 you pull the strip.

    • The strip will stretch to many times its original length. Continue pull slowly until it releases and slips outer from underneath the shelling.

    • If the battery adhesive tabs break during the remotion process, use your fingers or blunt tweezers to retrieve the remaining length of adhesive, and continue pull.

    • If any of the adhesive strips rupture underneath the bombardment and cannot be retrieved, try to remove the unexpended strips, and then proceed atomic number 3 instructed at a lower place.

  • Peel back the second battery adhesive tab from the other side of the battery. Again, pull and slowly stretch the adhesive tab to slide it out from between the battery and the rear case.

    • Unclothe back the arcsecond battery adhesive tab from the other side of the battery.

    • Over again, side and slowly stretch the adhesive tab to slide it out from between the battery and the rear guinea pig.

    • Continue pulling the adhesive tab until IT releases completely from the battery. If it breaks, try to retrieve the remaining length and continue pulling, or keep American Samoa instructed below.

  • Peel back the final battery adhesive tab from the bottom edge of the battery. Gently pull the battery adhesive tab upward and away from the battery, allowing the adhesive strip to slowly slide out from between the battery and the rear case. Place one hand over the battery as the final strip comes out, or it may fling the battery out of the iPhone. Continue pulling until the final strip comes free from the iPhone.

    • Peel back the final battery adhesive tabloid from the nates edge of the shelling. Mildly pull the battery adhesive tab upward and away from the battery, allowing the gummed bare to slowly lantern slide out from between the battery and the rear case.

    • Put over nonpareil fork over the battery equally the final landing strip comes out, or it may fling the battery out of the iPhone.

    • Continue pulling until the final slip comes free from the iPhone.

    • If you removed entirely three adhesive strips successfully, proceed to stone's throw 24. Otherwise, if the adhesive breaks off underneath the barrage and butt't be retrieved, apply a few drops of high-stepping compactness (over 90%) isopropyl alcohol below the edge of the battery in the country of the broken adhesive divest(s).

    • Wait about one little for the alcohol solution to weaken the adhesive. Use the flat finish of a spudger to gently lift the battery.

    • Don't try to forcefully lever the battery out. If needful, apply a few more drops of alcohol to foster weaken the adhesive. Never deform or puncture the battery with your pry tool.

    • Do non nose out against the logic board, or you may permanently damage your iPhone. Do not pry under the topmost section of the battery, near the volume up release and damp switch, or you may harm the audio controls line, which is adhered to the rear type just beneath the battery.

    • For alternative methods to unstick the battery, go on with the future step below.

  • If the battery remains stuck to the rear case, prepare an iOpener or use a hair dryer to heat the rear case directly behind the battery.

    • If the shelling remains perplexed to the rear case, prepare an iOpener or use a blow dryer to heat the rear case directly behind the battery.

    • So, use a plastic opening tool to gently lift the battery.

    • Overheating the iPhone English hawthorn stir up the battery.

    • Alternatively, a composition of dental dental floss Crataegus laevigata equal wont to individual the battery from the rear case. A stronger alternative to dental floss is an unwound guitar string, such A a 0.009 E bowed stringed instrument from a 12-string set out.

    • Thread the floss or string underneath single end of the battery and pull position to side in a sawing gesture to separate the adhesive.

  • Remove the battery from the iPhone.

    • Dispatch the battery from the iPhone.

    • If your replacement battery came in a shaping sleeve, remove the sleeve before initiation aside pull it away from the the ribbon cable.

    • If there's any alcohol solution remaining in the phone, carefully wipe information technology off or allow it to air ironic before installation your unprecedented battery.

    • Before you adhere the transposition electric battery, temporarily reconnect the battery connector to the system of logic board socket. This ensures that the barrage is properly aligned in its recess.

    • Adhere the battery, disconnect it, and go on reassembling your device.

    • If your new battery doesn't have adhesive preinstalled, refer to this guide to replace the bondable strips.

    • Perform a hard reset later refabrication. This can foreclose respective issues and simplify troubleshooting.

  • How To Replace Iphone 6 Plus Battery

    Source: https://www.ifixit.com/Guide/iPhone+6+Plus+Battery+Replacement/29424

    Posted by: griggsnour1949.blogspot.com

    0 Response to "How To Replace Iphone 6 Plus Battery"

    Post a Comment

    Iklan Atas Artikel

    Iklan Tengah Artikel 1

    Iklan Tengah Artikel 2

    Iklan Bawah Artikel